TLS - Setup
Thanks to Transport Layer Security (TLS) the connection between Shopware and Clarity&Success is encrypted. Without encryption your customer's orders would be sent in plain text to your Clarity&Success system. Due to privacy regulations it might be required to transmit sensitive customer data encrypted. So we highly recommend to set up a encrypted connection.
Obtaining a TLS Certificate
There are many certificate authorities (CA) who provide you with a TLS certificate. Usually you need a domain pointing to your Clarity&Success system. Please ask you domain administrator to set the A-Record (and/or AAAA-Record) to the ip address of you Clarity&Success system. You will need a static ip address or a dynamic dns provider in order to make sure that the domain is always pointing to the correct ip address. Please ask your IT administrator for help if you do not know how to set this up. After this is done, you can request a certificate from a CA or generate one yourself using OpenSSL for example. At the end you should have a .pfx file which then can be imported in Internet Information Services (IIS).
Creating a Self Signed Certificate
Our Shopware plugin allows you to upload the public key of a self signed certificate for validating and encrypting requests between Shopware and Clarity&Success. If you have OpenSSL installed on your computer, you can use following commands in order to create a self signed certificate.
$ openssl req -x509 -newkey rsa:4096 -keyout key.pem -out cert.pem -sha256 -days 3650
This will create a certificate and private key which is valid for 3650 days (~10 years). While regular TLS certificates are only valid for about 1-2 years for a good reason, we have a different scenario here. We can easily swap certificates at both ends (Shopware and Clarity&Success). If the private key would be leaked there are not million clients out there using this certificate where we would need to revoke it.
The command will ask you several questions. The important one
is: Common Name (e.g. server FQDN or YOUR name). Here you have to enter your
fully qualified domain name (FQDN) thus you domain without the protocol (e.g.
http). An example would be claritysuccess.wesionaire.com.
Windows IIS only accepts a pfx file. So we have to convert our key and certificate with following command:
$ openssl pkcs12 -export -out certificate.pfx -inkey key.pem -in cert.pem
Now you can install the certificate.pfx file which will be explained in the
next section.
Installing the Certificate
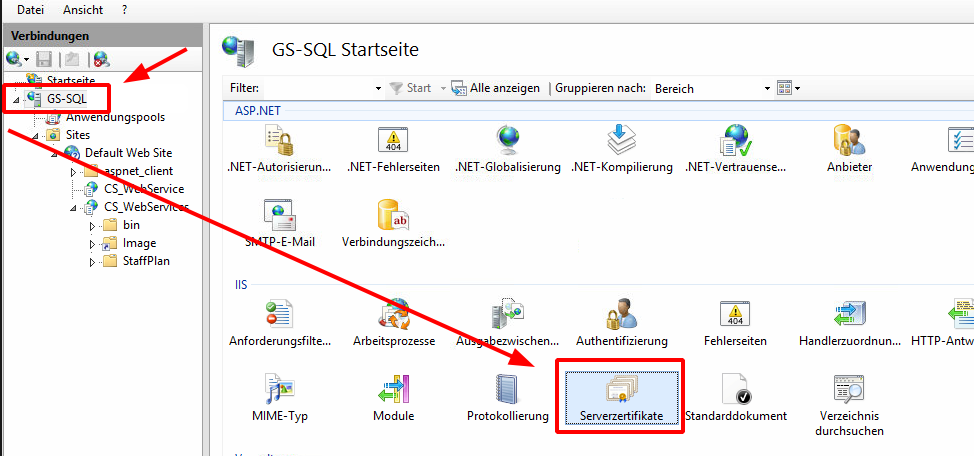
On your Clarity&Success server open the IIS manager. Select your sever at the left and then click on "server certificates".
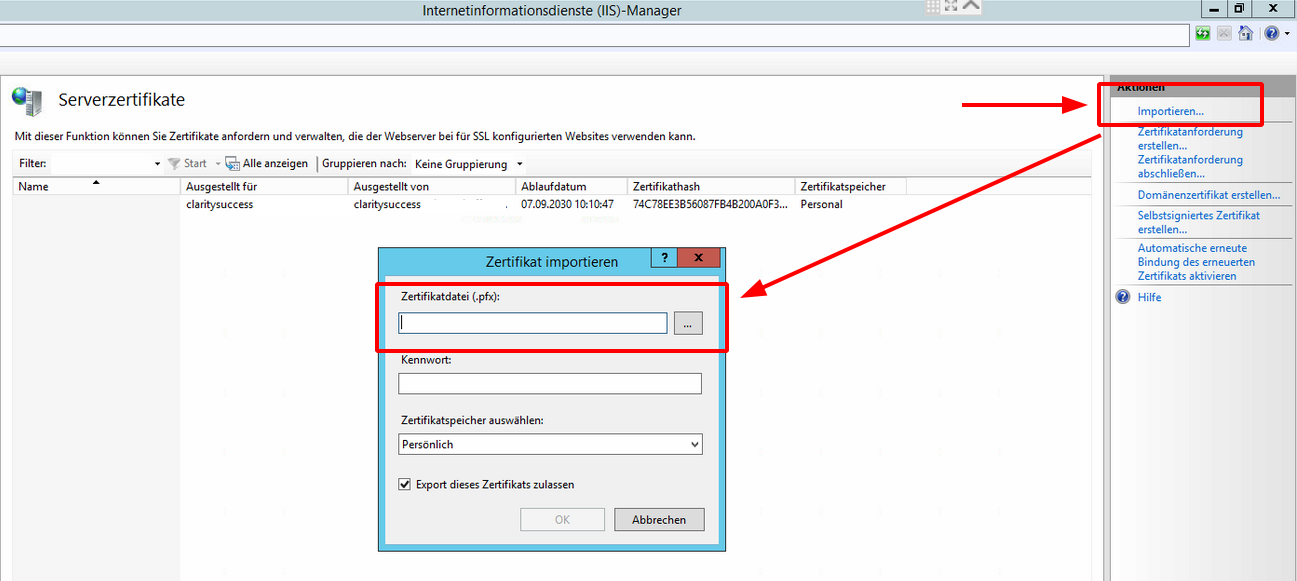
In order to import you certificate, click on "Import" on the right hand side, then select your .pfx certificate file.
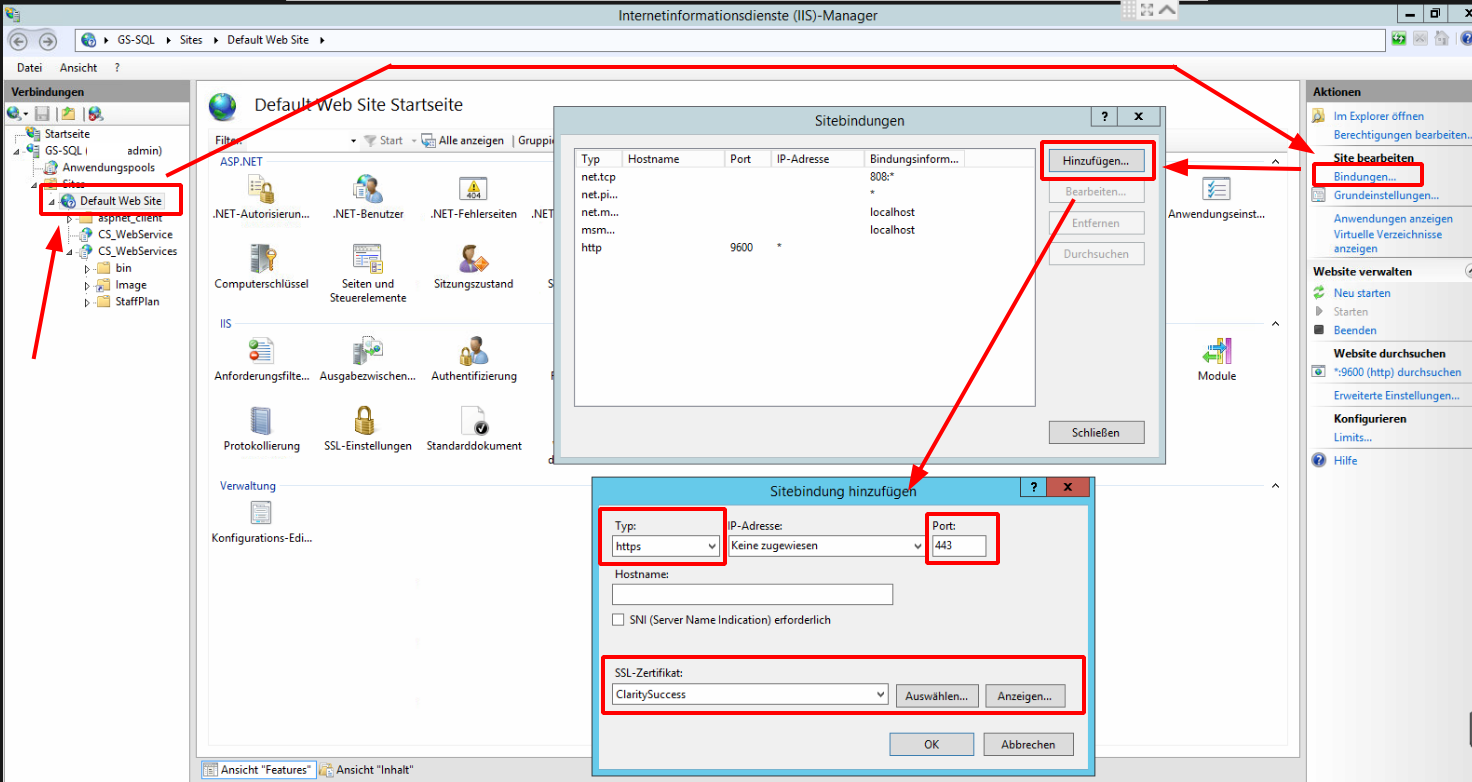
Select the server on the left (usually it is the one, which
has CS_Webservice or CS_Webservices as child). Click on "Bindings" on
the right and click on "add". Select "https" as type, set a port which can be
access from the internet and select the TLS certificate, which we imported
before.
Configure the Web Service
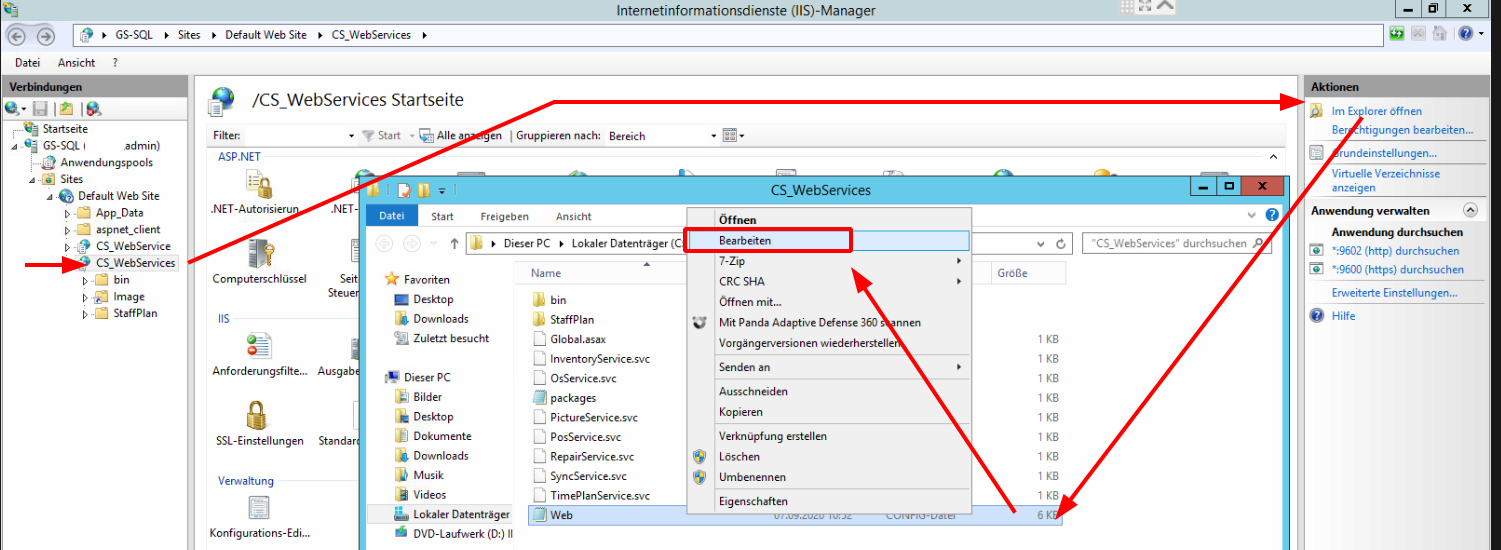
In the last step, we need to configure the Clarity&Success webservice to accept
encrypted connections. Select
CS_Webservice or CS_Webservices on the left. Click on "open in explorer"
. Right click on the "Web" config file and select "Edit".
Inside the file look out for the following lines:
<?xml version="1.0" encoding="utf-8"?>
<configuration>
    <!-- ... -->
    <bindings>
        <webHttpBinding>
            <!-- Very important part for upload of multipart data! -->
            <binding maxBufferSize="2147483647" maxBufferPoolSize="2147483647"
                     maxReceivedMessageSize="2147483647"
                     transferMode="Streamed">
                <readerQuotas maxDepth="2147483647"
                              maxStringContentLength="2147483647"
                              maxArrayLength="2147483647"
                              maxBytesPerRead="2147483647"
                              maxNameTableCharCount="2147483647"/>
            </binding>
        </webHttpBinding>
    </bindings>
    <!-- ... -->
</configuration>
You have to add <security mode="Transport"/> inside the webHttpBinding
tag . At the end, this section should look like this:
<?xml version="1.0" encoding="utf-8"?>
<configuration>
    <!-- ... -->
    <bindings>
        <webHttpBinding>
            <!-- Very important part for upload of multipart data! -->
            <binding maxBufferSize="2147483647" maxBufferPoolSize="2147483647"
                     maxReceivedMessageSize="2147483647"
                     transferMode="Streamed">
                <readerQuotas maxDepth="2147483647"
                              maxStringContentLength="2147483647"
                              maxArrayLength="2147483647"
                              maxBytesPerRead="2147483647"
                              maxNameTableCharCount="2147483647"/>
                <security mode="Transport"/>
            </binding>
        </webHttpBinding>
    </bindings>
    <!-- ... -->
</configuration>
That is it! Please restart the server to make sure the changes will be applied. Click on the main server (usually GS-SQL) inside the left menu and then in the right menu click on "restart server".